SS

SS

Sunday, December 23, 2012

~ Eagle Eyes ~

Do not blink ~ just kidding*

The game of "I Spy" with my Eagle Eyes.

 
Keeping the detail real


Looking for anomalies before the final coats of primer.


"I Spied" anomalies!!!! (circled, lined areas)

(PS Chip mold size 3"x4"ish  *Justin*)
 
I use a piece of rolled wet/dry sand paper 320+grit from sheets, can find at a hardware store.  Then a pinch of buff grit sanding sponge (fingernail supplies).
 

Saturday, December 22, 2012

~Setting Up The Big Tent~

~Studio Tip

When the weather is really snappy cold outside it makes it difficult to get a good prim or finish to a plastic model horse properly.  So to prevent sticky, streaking, spitting from your can, or spray to model, try the following tips.

*In a small area~ I picked  a guarded second bathroom, this will be my make shift comparable tent space indoors.

*Prepare a backdrop ~ old towels pinned to shower and placed on the floor.  This works for fixative or finish.

*Light brisk spray from water bottle to help pin down the floaty fuzzies* towards the backdrops. preperation

*The small area was picked so that I can easily keep a nice workable temperature for plastic model, paint, primer, fixative, finish.  Also to control the air flow from unwanted particles or at least to a minimum.  A space heater is at the bottom of photo.  Notice the distance from products. and angle to product.

*Primer~ has a slightly different set up for spraying but the heating is the same. At peak heat of the day, no wind, in a secluded area in a shed, tarps or long strips of plastic hang to make a similar paint tent.  I do not prim indoors any longer the mist dust from the primer spreads through out the house.

*walking distance from shed to bathroom is short for optimum dying at proper temps (back of cans).

*Spray is at short light bursts and not ending directly or starting on model.  Let dry in between spraying. do not do to many coats at a time. 2 to 3 light coats are good enough....

Need to mention, old sheets work the best for backdrops but we were fresh out.
 

Tuesday, December 11, 2012

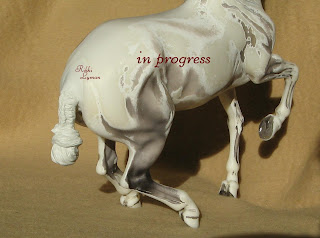
*Progress On The ~Old Romance~

Overall appearance* although the custom re-sculpt has tiny English braids the western saddle may be out of place ~ maybe western dressage class?
PS QH Chip (3x4"ish) *Justin*
:)
Not totally happy with the micro English braids, I think a little more detail work will be needed*
The first light coat of primer usually helps find any anomalies.
 

Tuesday, December 4, 2012

~Old Romances~ Kindled*

Once was a thing of the past, now has become a current romance!  This little custom re-sculpt was first worked on a few years ago.  He was worked on here and there but I just was not feeling him completely at least until my son's recent English riding lesson and how he always talks of a Quarter Horse that fits his dreams.  *Kindled*
 
progress
 
Quarter Horse with English Braids PS Chips


Wednesday, November 28, 2012

~Apples to Apples~

A little Photography tip*

When visually conveying your photographic subject to the mass crowd keep in mind not all the viewing public have an idea of the size of subject.

The most common comparison item is a quarter ($) laid next to the photographic subject.  I like to use playful items that most of the public can relate too, as this piece of Holiday Candy :)
The photo subject is Little Lone Star ~ available

Thursday, November 15, 2012

*Lights On*

~Studio Tip~
Lighting* I use natural day light bulbs instead of the regular low home lighting. If you were to compare the bulbs the regular would through a yellowish false light, were as the natural day light is close to true light. When painting you need the real thing ;) You can find the inexpensive bulbs ($6) at a Home Depot or like store.

Friday, November 9, 2012

~The Little Suprise~

Surprise Surprise indeed a little cutie*.
 
Jaime Baker finished this little guy with some amazing paint details ~ Teeny Tiny Spots!!
 
The Little Surprise did not always start out so cute :(  Follow his photo journal below as he was created.
 
Dimentions; 1"x 2"ish ~Photo is compliments of Jaime Baker*


Started as a Breyer stablemate pony
 

Just one of many real pony reference photos were used 


Sunday, November 4, 2012

*Blast From The Past*

~An almost forgotten past creation was spurred by a friend and Artist Billie Campbell ~ Thank You!
A great day to reminisces!
With that in thought Billie inspired me to dig up some photos of the Bridger resin painted by some great Artist's.
Wonderful Work*


Painted by Lisa Bickford (Appy)
Painted by Deb Brown (paint)
Painted by Meghann Hoscheid Lorei
Painted by Kim Shepherd
Painted by Billie Campbell

Tuesday, October 30, 2012

~Keep It Clean~

~Studio Tip~ Before you get started on the hooves lay down a section of 'clear wrap' it sticks to most surfaces & does not easily bunch up while working. That gives you 2 free hands & less handling the sculpt. Most of all a quick clean work table ;)
custom sculpt model horse is 'Eli' for quick referencing. Thank you for peeking ;p

Monday, October 29, 2012

~A Leg Up~

Just a quick photo of Little Lone Star's detailed hind leg. Approximate size is length of leg is equal to width of a quarter (1")long x diameter of leg is less than 1/8".


Many super thinned down layers of white varieations were applied for a realistic look.

Tuesday, October 23, 2012

Behind the Scenes

The Little Lone Star (aka; Between Guy) went as planned with added base color to the eyes, some ear edging, and the white marking to give him character. Went with the leg marking pattern from our real horse.  The markings are not flat bright white, there is contrasting variations of white along with mapping.
Like I said this all went according to plan, EXCEPT you think I could get a good photo ~nope!  So instead I will share a behind the scenes look.

Monday, October 22, 2012

~Rainy Day Studio Tip~

Beautiful Fall Rainy Days* always but me in the mood to doodle or write, so thought this would be a good time to share a Studio Tip*.

When preparing your pastel chaulk for use, shave with sharp blade in an upward motion (arrow) so you get finer shavings and less lumps. This direction also naturally helps you from pushing or digging into your chaulk

Monday, October 15, 2012

~Final Prep~

 
*Studio Tip*
 
Before & in between priming I use an older but not ratty pillow case. The material is less likely to leave behind unwanted fibers. This is a light way of removing any remaining sanding particles or rough spots from primer by gently rubbing. Some Artsy folks use socks or dish linen.
Recommend using gloves so you do not leave oil residue left by your fingers, it will effect the paint work.
 
 
Resin cast is by Debbi Lermond sold out edition Working For Chex.

Wednesday, October 10, 2012

*Cold Temperature Painting*

When the weather starts to change to colder temperatures it can make fun painting just a little more challenging.  To avoid sticky spray or frosting from your fixatives or primers a quick easy method such as follows.
warm can to recommended temperature by surrounding with warm tap water. Fill under half the depth of the can.

keep shaken between use. If the can gets to warm simply remove for a time.  Quick & Easy.

I also keep a dummy model around, just to make sure there is not a problem before spraying the real deal.

Wednesday, October 3, 2012

~Blue Dapples Today~

Little Lone Star (aka, Between Guy) shown in progress to the almost midway point.
 

    Top photo he received some depth by adding blue dapples.
 
 
  Second photo he was coated with bright orange & red brown dapples slightly started to show through.
 
 
He started with 2 light coats of wheat color powder pastels (bottom photo).

Thursday, September 27, 2012

~Riley The Circus Horse~ Ta Dah!!

Fantastic* paint work by Jaime Baker & photo compliments of Jaime Baker*

Digging back into the fond memories of when the circus came to town and performed spectacular tricks with their horses & ponies ignited a creative will, from that passion Riley began.

 
The entire neck was cut from the TWH stablemate, the tail was removed. The right hind quarter was removed there by placing the right leg in its new position.  Same with front left shoulder & left leg moved to new position. Then very small angle cuts were made at left front knee & pastern.  Super clue & baking soda quickly attach the wire to hold neck to body at the correct length, legs were re-attached the same way.  Apoxy was then generally added, muscling will be added in then next step.
 
 
Riley's pedestal was started from a milk jug cap.
The circus monkey's are there for entertainment :)


 Mane & Tail were added by using Apoxy & fine detail started by using Amazing Sculpt.

 
First coat of primer. Upon this first coat of primer I found a few anomalies including some additional muscling needed on the front leg.
Riley also makes a great kids horse :) (little girl is a Linda York resin)
 
 
The pedestal see's stars* cut outs super clued to milk cap.  Then an upper rim was added to look like the real references used.
 
 
Riley was ready for the circus* along with a few friends :)


Just one of the many reference photos used along with my son having his real pony pose to see how the muscling & structure moved.

 
Our Little Circus Pony* The End

Wednesday, September 26, 2012

~A Bit Classical~

The small details are continually added in and around the mouth and facial areas. Tooth rings, muscling, wrinkles...real horse referencing is carefuly reviewed. Skip will have a bit of classical taste.
~Strutt'n Steed Studio~ has a face book page :)

Thursday, September 13, 2012

*New Chompers for Skip*

Skip was happy to receive new horsey type chompers today instead of the human denture type :D compare to his previous post photos.  Along with new chompers he received an improved swishy tail, will show next few days-ish?

Wednesday, September 12, 2012

~Skip's Close Up~

Skip received a new swept hairdo today.  It fit his confidence, along with his found confidence he received a masculine chin & neck....

Monday, September 10, 2012

~The New Guy~

WOW! just LOVE Summer*

Just as Super Excited to start back to customizing some new equine remodel sculptures! :)

The new Guy? or Skip for now :) we thought it might be a cool English type name. I have been working on Skip on and off now for quite some time, in-between other projects and life in general.  But as recent Skip has inspired me to move forward with more detail.  So here is a taste of whats to come in an up-coming customizing journal.

Wednesday, April 18, 2012

~Rozo's Story~

As promised to viewers the finished Rozo :D 
 
The complete How Rozo was customized photo journal, from start to show Hottie finish.
 Rozo can tell his story.

Rozo's Journal*
First photo compliments of Lisa

Alborozo from the start - original mold.
Mane & tail were removed (leave rough). Seams sanded. Horse is weighted for counter balance (blob on leg)

air hole drilled between hind legs.  Hole drilled on tail end knob for tail attachment. And Counter balance hole is drilled for fill.
Neck sculpted on along with forehead.  Tail knob started
Head Work
Evening the ears & sculpting the low neck line
Tail Braiding - Layers
Bridge Work
First Prim. Rozo's bobs are wrapped to protect from over spray

 
Use the light to help find anomalies before & after prim


buffing last coat of primer
Rozo is ready for the Finishing Painting Artist*
:D Ready
All customizing completed by Rikki Lyman of Strutt'n steed Studio (blog), Art By Rikki (FB).
Show photo is compliments of Lisa